This page uses javascript to help render elements, if you have problems please enable javascript.
 
You are now inside the main content area


left col

Page Properties 

The page properties sets up your pages structure, creates your document title, and can add external elements to your page such as any info blocks you have created, embedded iframe content, or campus calendar items to name a few.  In this section you will learn what each section in the page properties does and how to use them.

diagram showing properties tab

NOTE: The light bulb icon is on in the image above. That means that the page has been checked out. A page must be checked out in order to access all of the page properties options shown below.

Title & Metadata

right col
 
 
left col

Title

Provide a properly formated title for your page. Using the content in your header 1, or something similar to it, is best practice. 

Why is this important?  When you publish your page, we take the your title, add your site name, add CSUF, and that is what the search engines see. When your page comes up in search engine results, this is what will be displayed.

Description & Tags

Description and tags are meta data that can be included in your html documents.  HOWEVER, using these improperly can hurt you in search results more than help.  

Descriptions should be unique to each page and reflect the content found there.  You do not need to use this to get good search results.

Tags, or keywords, are a degrated feature in search engines, so we recommend not using this.

See our search engine optimization help in best practices for more information.

page properties title and metadata section

right col
 
 
left col
right col
 
left col
right col
 
left col

Custom Settings

right col
 
 
left col

Header Setup

There are three header format options: normal setup, landing page, and presentation page. Normal setup is default and should be used for most pages, but your homepage and special event pages can use these alternative formats. 

See the different headers and how to set them up in our page header style guide.

header setup options

right col
 
 
left col

Page Redirect Options

This option allows you to redirect users to a new URL that's different from one that was originally requested. If you would like to use the redirect feature, enter the new URL Redirect URL field and choose the time frame from the drop down menu; immediately, or 10, 20, or 30 seconds.

page redirect options

right col
 
 
left col

Search Engine Indexing

Search engines collect, parse and store data during the process of indexing. By default, search engines will index all of your content.  The Search Index options allows you to tell search engines to do one of the following: 

  • Completely index page (default)
  • Index page but do NOT index links
  • Do NOT index the page, but do index links
  • Do NOT index the page and do NOT index the links

Note: We cannot guarantee that any search engine will follow these rules.  There are hundereds of web crawlers out there.

diagram showing search engine indexing options

right col
 
 
left col

Basic Page Settings

A Breadcrumb is a small text path, often located at the top of a page, indicating where the user is on your site. You have the option to Show or Hide breadcrumbs.

Page Banners are a feature that allow you to add a quick and easy visual element to any page. This is helpful for sites that are text heavy and don't require any images/visuals. It can add style to your page with low effort. See our documentation on page banners for more.

Left Menu Navigation

Left Menu Navigation options have been simplified.  Leave this setting alone whether you are using left navigation or not. 

If you are NOT using a left navigation, then this setting is ignored.

If you ARE using a left navigation in a folder, then your file will show up.  If you have a page you do not want a navigation file on, then you can select Hide Navigation Bar.

diagram showing basic settings and left menu options

right col
 
left col
right col
 
left col

Top Media

right col
 
 
left col

Top Media is off by default.  Checking the Show top media section box will turn on a new editable zone that will go above the rest of your content on your page.

See the next section below for data object information. 

diagram showing top media options

right col
 
 
left col
right col
 
left col
right col
 
left col

Content Setup

right col
 
 
left col

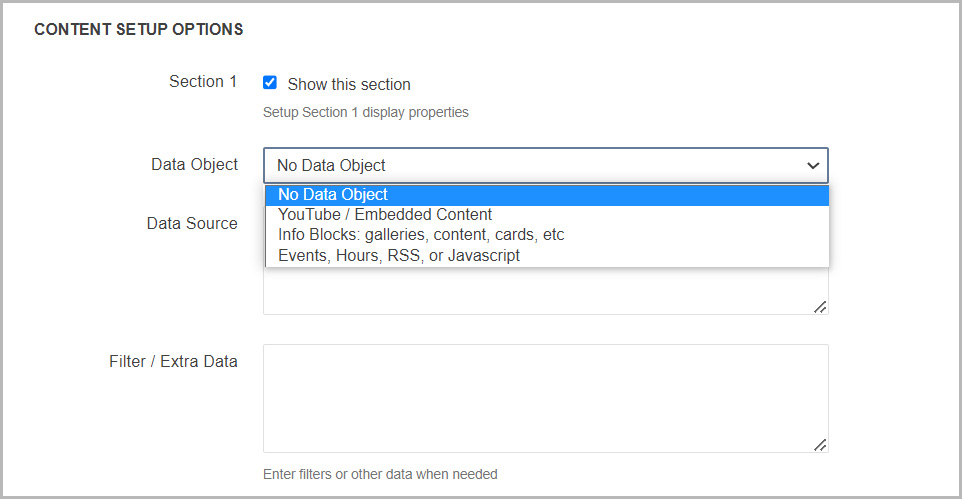
Content Setup Options is the same for every section of your page.  

All sections are set to show by default. If you quickly need to hide content for a short term, unchecking the show this section box is available.  It is NOT recommended that you turn off sections simply because they are empty.  Any section left empty in edit mode will not show up in live mode. 

Data Object

Each section allows for an object to be added to that section. The options are: 

  • No Data Object (default)
  • YouTube / Embedded Content
  • Info Blocks
  • Events, Hours, RSS, or Javascript

Items above are linked to their respective documentation, including information on their data sources.

Data Source

The data source will vary depending on what is selected above. 

  • YouTube or embedded content is anything in an iFrame.  
  • Info Blocks are data that you curate.  An info block can be regular reusable content, image gallery, microblog, media layout, application data (filterable text content), or a directory (people/item/services, etc.).  When you create an info block, the data source is include in the file at the top of the page.
  • Events, Hours, RSS, or Javascript datasources vary. 
    • In the _setup folder you will find files for hours and events that you can configured for use on your site. 
    • Contact the web team for help with RSS or Javascript files.

Filter / Extra Data

For most data sources, there is no filter or extra data.  This area is used for to filter specific data from the campus calendar, or for added Javascript functions.  

diagram showing content setup options

right col
 
 
left col
right col
 
left col
right col