This page uses javascript to help render elements, if you have problems please enable javascript.
 
You are now inside the main content area
 
left col

Info Blocks: Hours

Hours

The info block file for hours is a special type of info block.  There is only one file per site and it is located in the root under the setup folder.  Below learn how to create hours for your site, service desks, departments, or anything that helps users get to the right place at the right time.


Looking for help on how to display hours on your pages using widgets?

If you want to use a specific hours entry, or even a set of hours, you can add them to your pages using the page properties.  See our guide for adding hours to pages for details including style variations.

right col
 
left col

What are website hours?

Many of the places that use websites on Campus have a physical location.  Hours was designed to help you manage one or more spaces that users can visit.

The website Hours page is an info block format with up to 50 spaces for hours.  This allows a site to have multiple hours defined for various needs which have a start and end time over some kind of date range.

Main site hours vs other hours

Websites can have one set of hours that display in the top header.  Every page shows how much longer it is open or closed. Site owners have the aiblity to indicate which is used for site wide display. 

If you have Spring, Summer, and Fall hours that are different, create each one in a separate hours section, then choose to display them in the header when you need them.  That way you don't have to constantly delete and replace hours, just keep the data updated for less editing.

Hours can be pulled into a page as a widget which allows content to be posted where you need it.  If you have a page dedicated to a specific service then you can pull just those hours onto the page with it.  Since all the hours are managed centrally you can just modify hours, republish, and any pages using the data should automatically update.

right col
 
left col

Hours Editor

The hours editor has one editable section per block item.  Following the same structure as the Details, Hours uses a drop down list of styles to organize data into meaningful content.  There is no specific order in which data needs to be entered, but follow the instructions below to make sure entries are formatted correctly.  Since this uses dates and times you must enter them correctly.

If you notice that widgets or site hours are not formatting as expected, check the source code in your Hours editor.    characters can cause errors in the formatting.

right col
 
 
left col

Hours Data

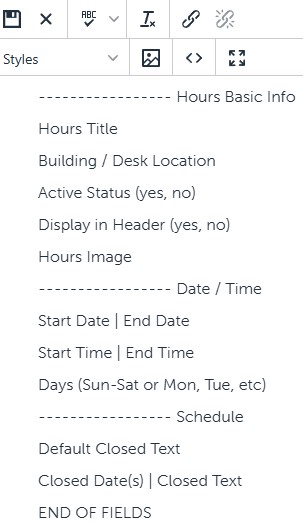
From within the hours editing section you will see there is a styles drop down.  It is built into three main areas:

  • Hours Basic Info
  • Date / Time
  • Schedule

Data that has no style will be ignored, or could cause errors to occur. Items that are labled with multiple styles can also cause errors. 

Double check your source code when troubleshooting problems.

Use plain text when entering data.  Only images are allowed in the Hours Image.  Do not use hyperlinks, bolds, or other HTML elements for your data entry.

Hours editor style choices, see Hours Data for more details

right col


left col

Hours Basic Info

  • Hours Title
    This is plain text that will make sense to a user.
  • Building / Desk Location
    This is also plain text and should make sense to a user.
  • Active Status (yes, no)
    The default for hours is "no".  Set to "yes" when you want to display the hours.  Once you publish the page it should be available to display.
  • Display in Header (yes, no)
    Set to "yes" when you want to use the section as header information.  This will display on all pages within the site and only one is allowed at a time.  The first instance will be used for display.
  • Hours Image
    Choose an image to display in the widget.  This image is only for widgets and will not change headers.  Images should not be used to convey directions or have important text, these are for decorative use only.

Date / Time 

  • Start Date | End Date
    Use a valid date format (mm/dd/yyyy).  Add the pipe symbol " | " with a space on each site to separate the start and end dates.
    If you only have a single date you can just use that date without an end date.
  • Start Time | End Time
    Use a valid time format (hh:mm am/pm).
    If you have split shifts you can enter multiple times using separate lines.  See below for more information on various time examples.
  • Days (Sun-Sat or Mon, Tue, etc)
    Enter the days using the first three letters of the day.  You can comma separate or hypenate ranges of days.

Schedule

  • Default Closed Text
    The default closed text is just "closed" when nothing is defined. Use plain text to define a new term to use when after hours.
  • Closed Dates(s) | Closed Text
    If you have holiday or other non-standard closures you can enter those including specific text. 
    The closed dates can be a single day or date range using a hypen with a pipe " | " and then the closed term for that time period.
right col
 
left col

Hours Basic Settings

Below you'll find the basic settings for getting hours working.  If you're looking for variation or how-to set up other situations we have some examples further down on the page.

right col
 
 
left col

Below are the settings used to create the Fall Semester Hours.

Hours Title
Fall Semester

Start Date | End Date
8/24/2024 | 12/06/2024

Start Time | End Time
Mon, Tue, Wed, Thu | 9:00am - 5:00pm

Start Time | End Time
Fri | 8:40am - 5:00pm

Default Closed Text
Closed

Closed Date(s) | Closed Text
09/02/2024 | Labor Day

Closed Date(s) | Closed Text
11/11/2024 | Veterans Day

Closed Date(s) | Closed Text
11/28/2024, 11/29/2024 | Fall Recess

Active Status (yes, no)
yes

Display in Header (yes, no)
yes

ajax space
right col
 
left col
right col
 
left col
right col
 
left col
right col
 
left col
right col
 
left col
right col
 
left col
right col
 
left col

Advanced Set Up Options

For every straightforward Monday - Friday, 9am - 5pm schedule there are three others that don't fit that format.  Below you'll see some examples of situations where we explain how to set up hours to make it work.  If you have a need that isn't listed below reach out to the web team for guidance.

right col
 
left col

Days with split shifts

right col
 
 
left col

If you wanted to make hours where Monday, Wednesday, Friday were 10am - 2pm and Tuesday, Thursday were 10am - noon and 2:30pm - 5pm here's the easiest set up.

Set up assumes you enter active status, hours title, and a start / end date.

Days: Mon, Wed, Fri

Start Time | End Time: 10am | 2pm

When dealing with specific days you can use the Start Time | End Time and put the day in front of the data.

Start Time | End Time: Tue, Thu | 10 am - 12pm

Start Time | End Time: Tue, Thu | 2:30pm - 5pm

You can add additional entries for any day to help make it cleaner and easier to edit.  The system will append the time where needed.  

ajax space
right col
 
left col

Special Event / Holiday Closures

right col
 
 
left col

Special Events and Holiday Schedules are not built in by default.  If you're going to be closed here's how to list those days so users can see the information.

This example assumes you are using an active event set up with data added for title, active, days, and times.

Closed Date(s) | Closed Text
09/02/2024 | Labor Day

Closed Date(s) | Closed Text
11/27/2026 - 11/27/2026 | Thanksgiving Break

Closed Date(s) | Closed Text
10/30/2026 | Pre-Halloween Set Up

If the current day is a closed date, the widget will automatically show "Currently Closed"

Upcoming Closures will automatically remove closed dates that have passed.  

ajax space
right col
 
left col
right col
 
 
left col
right col
 
left col
right col
 
left col
right col
 
 
left col
right col
 
left col
right col
 
 
left col
right col
 
left col
right col
 
 
left col
right col
 
left col
right col
 
left col
right col
 
 
left col
right col
 
left col
right col
 
 
left col
right col
 
left col
right col
 
 
left col
right col